

The Homemade Dinosaur Valentine Box Shoebox Craft Idea by Adventures of Mel is a fun and creative project for kids. This craft transforms an ordinary shoebox into a delightful dinosaur-themed Valentine holder.
Creating a dinosaur Valentine box is an excellent way to engage kids in a fun, hands-on activity. This project not only sparks creativity but also provides a personal touch to Valentine’s Day celebrations. Using simple materials like a shoebox, construction paper, and glue, kids can craft their very own dinosaur-themed box.
It’s a delightful way to store and exchange Valentine’s cards. Plus, the process of making it can be a memorable bonding experience for parents and children. This craft idea is both easy to follow and incredibly rewarding.
Materials Needed
Creating a Homemade Dinosaur Valentine Box is a fun and creative activity. You need specific materials to bring this craft idea to life. Let’s dive into the essential items required for this exciting project.
Shoebox
The foundation of your dinosaur Valentine box is a sturdy shoebox. Ensure the shoebox is big enough to hold valentines. You can use any size, but a medium-sized box works best.
Craft Supplies
Gathering the right craft supplies is crucial for this project. Here is a list of items you will need:
- Construction paper in various colors (green, brown, red)
- Scissors for cutting shapes and details
- Glue or a glue stick for assembling parts
- Markers or crayons for drawing features
- Googly eyes to give your dinosaur a fun look
- Pipe cleaners for creating limbs or accents
- Paint and paintbrushes for adding color
- Stickers or decorative tape for extra flair
Ensure you have all these materials ready before starting the craft. This helps in making the process smooth and enjoyable.
Credit: adventuresofmel.com
Preparing The Shoebox
Creating a Homemade Dinosaur Valentine Box is an exciting project. It all starts with preparing the shoebox. You’ll need a few basic materials to get started. Follow these simple steps to make the perfect dinosaur box.
Cutting The Opening
First, grab your shoebox and scissors. Carefully cut a slit on the top of the box. This will be where the valentines go. Make sure the opening is large enough for cards. You might need an adult’s help with this step.
Here’s a quick guide:
- Mark the spot for the opening with a pencil.
- Use a ruler to keep your lines straight.
- Cut slowly to avoid mistakes.
Covering The Box
Next, it’s time to cover the box. Choose colorful wrapping paper or construction paper. This will be the dinosaur’s skin. Wrap the paper around the shoebox, making sure it’s smooth.
Follow these steps:
- Measure the paper to fit the box.
- Cut the paper to the right size.
- Use glue or tape to secure the paper.
- Smooth out any wrinkles.
For extra fun, you can use green or brown paper to make it look like a real dinosaur. Add some texture with glitter or stickers. This will make your dinosaur box unique and eye-catching.
Creating The Dinosaur Shape
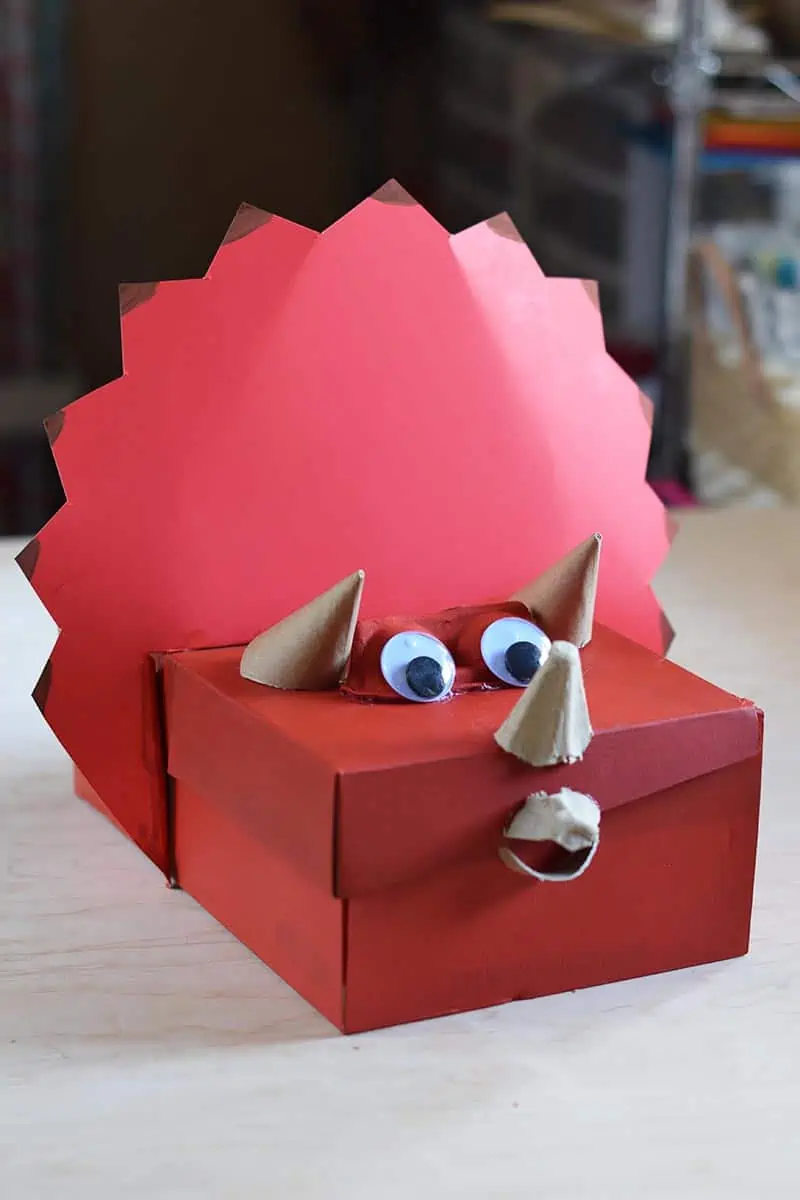
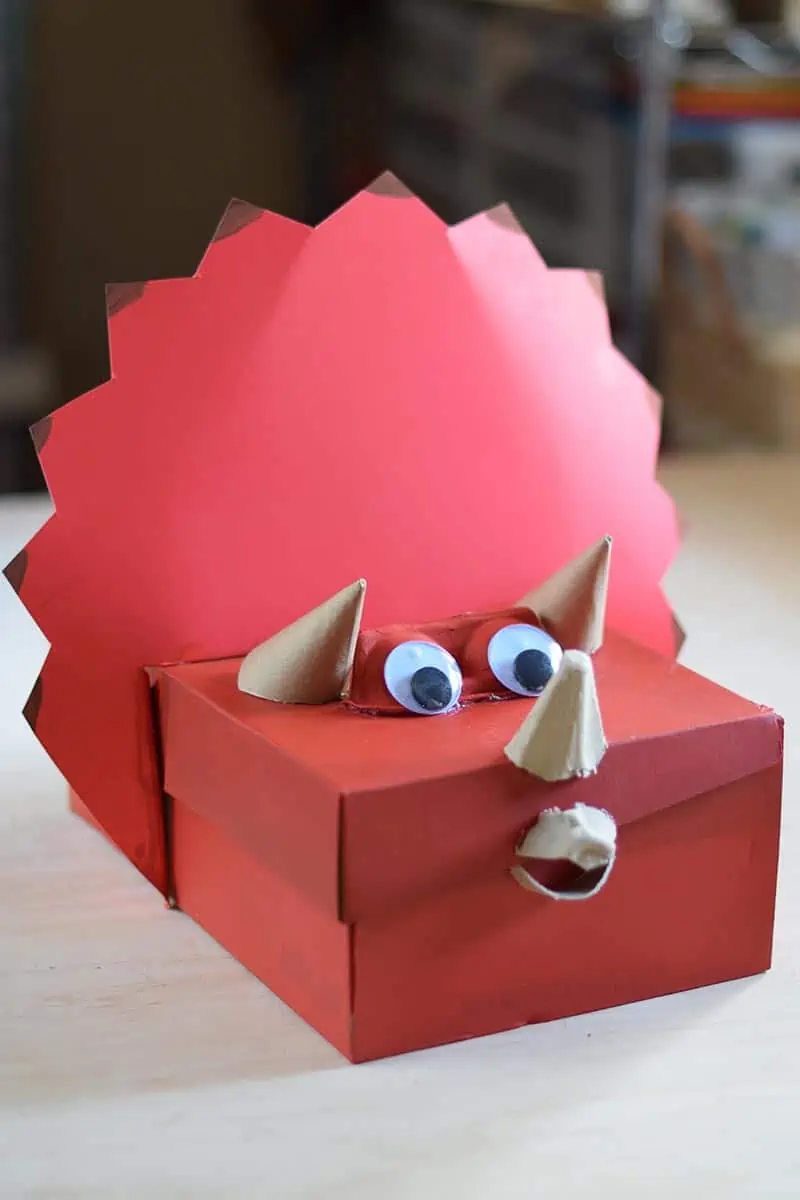
Unleash your creativity with a fun, homemade Dinosaur Valentine Box. This shoebox craft idea from Adventures of Mel will make your kids excited for Valentine’s Day. Begin with creating the dinosaur shape. Follow our simple steps to make your dinosaur unique and eye-catching.
Designing The Head
Start by designing the dinosaur’s head. Use a piece of cardboard. Draw an outline of the head with a pencil. Add details like eyes, nostrils, and a big smile. Cut out the head shape carefully with scissors. Attach googly eyes for a fun touch. Glue the head to one end of the shoebox. Make sure it is secure and stands upright.
Forming The Tail
Next, form the tail. Use another piece of cardboard. Draw a long, curved tail shape. Make sure it is in proportion to the body. Cut out the tail shape. Decorate it with colorful paints or markers. Add details like scales for a realistic look. Attach the tail to the opposite end of the shoebox. Ensure it is firmly glued and can stand on its own.
Credit: adventuresofmel.com
Adding Details
Adding details to your homemade dinosaur Valentine box can make it come alive. These small touches will add character and charm. Let’s explore some fun ways to add eyes, mouth, scales, and spikes.
Eyes And Mouth
The eyes and mouth are crucial for giving your dinosaur personality. Use googly eyes for a fun look. Alternatively, you can draw eyes with markers. Attach the eyes using glue.
For the mouth, cut a piece of red or pink paper. Shape it like a smile or a roar. Glue the mouth below the eyes. Add small white triangles for teeth.
Scales And Spikes
Scales and spikes add texture to your dinosaur. Cut small circles from colored paper. Glue them onto the box as scales. Arrange them in rows for a realistic look.
For spikes, cut triangle shapes from stiff paper or foam. Glue them along the spine of the box. You can also add spikes to the tail for extra detail.
| Detail | Materials | Steps |
|---|---|---|
| Eyes | Googly eyes, markers, glue | Attach googly eyes or draw them |
| Mouth | Red or pink paper, glue, markers | Cut and glue a mouth shape, add teeth |
| Scales | Colored paper, glue | Cut and glue small circles |
| Spikes | Stiff paper or foam, glue | Cut and glue triangle shapes |
Painting And Decorating
Painting and decorating your Homemade Dinosaur Valentine Box is the most exciting step. This is where your creativity shines. A well-decorated box makes your dinosaur-themed craft come alive. Follow these steps to make your box the best in class.
Choosing Colors
Choosing the right colors is crucial. Bright colors make the box stand out. Think about your favorite dinosaurs. Green, brown, and grey are excellent choices for a realistic look. For a playful touch, use vibrant colors like red, blue, and yellow.
| Dinosaur | Color Suggestions |
|---|---|
| Tyrannosaurus Rex | Green, Brown |
| Stegosaurus | Blue, Grey |
| Triceratops | Red, Yellow |
Applying Paint
Start by applying a base coat to your shoebox. This helps the colors pop. Use a large brush to cover the box quickly. Let the base coat dry completely before adding more colors.
- Use small brushes for details.
- Paint scales, eyes, and teeth.
- Add glitter for a magical touch.
Be patient while the paint dries. It ensures a neat finish. Once dry, you can add stickers or draw patterns. This adds a unique touch to your Dinosaur Valentine Box.
Remember, there’s no wrong way to decorate. Let your imagination run wild. Enjoy the process and have fun!

Credit: www.pinterest.com
Attaching The Legs
Creating a homemade dinosaur Valentine box shoebox craft is a fun activity. Attaching the legs gives the dinosaur its personality. This step ensures your dinosaur stands tall and looks amazing. Let’s dive into the two main parts of attaching the legs: cutting the legs and securing to the box.
Cutting The Legs
To start, you need to cut out the legs. Use sturdy cardboard for strong legs. Draw four leg shapes on the cardboard. Each leg should be the same size. Use scissors to cut out the legs carefully. Make sure the edges are smooth to avoid any injuries.
- Draw four leg shapes on cardboard.
- Use scissors to cut out the legs.
- Ensure the edges are smooth.
Now, you have four dinosaur legs ready to attach to the box. Let’s move on to securing the legs to your shoebox.
Securing To The Box
First, decide where the legs will attach. Mark these spots on the shoebox. Use a glue gun for strong adhesion. Apply glue to the top edge of each leg. Press each leg onto the marked spots. Hold each leg until the glue dries.
- Mark spots where legs will attach.
- Apply glue to the top edge of each leg.
- Press legs onto the shoebox.
- Hold until the glue dries.
Once the glue dries, check if the legs are secure. Your dinosaur should now stand on its own. This step completes the leg attachment process. Enjoy watching your dinosaur come to life!
Final Touches
The final touches can make your Homemade Dinosaur Valentine Box truly special. These little details will transform your craft into a masterpiece. Let’s add some sparkle and personalization to your project!
Adding Glitter
Glitter adds a magical touch to any craft. Begin by choosing your favorite colors. Apply glue to the areas you want to sparkle. Sprinkle glitter over the glue and let it dry. Shake off the excess glitter to reveal a shiny surface. You can add glitter to the dinosaur’s spikes, tail, or even the box itself. Remember to use a tray to catch the extra glitter.
Personalizing With Names
Personalizing your Dinosaur Valentine Box makes it unique. Use stickers, markers, or paint to write your name. You can also add the names of friends or family. Choose colors that stand out against the box. You can also use stencils for a neat look. Adding names helps everyone know which box is theirs. This step also adds a special touch to the craft.
| Materials Needed | Purpose |
|---|---|
| Glitter | Add sparkle and magic |
| Glue | Stick glitter to the box |
| Stickers/Markers/Paint | Personalize with names |
| Stencils | Create neat and clean letters |
- Choose glitter colors.
- Apply glue to desired areas.
- Sprinkle glitter over glue.
- Shake off excess glitter.
- Write names using stickers or markers.
- Use stencils for clean letters.
Valentine’s Day Use
Valentine’s Day is a special time for kids to exchange cards and sweet messages. Crafting a Homemade Dinosaur Valentine Box can make this day even more exciting. This unique shoebox craft idea from Adventures of Mel turns a simple box into a fun, personalized card collector.
Collecting Cards
The Dinosaur Valentine Box is perfect for collecting cards. Kids can easily drop their cards into the box through a slot. The dinosaur-themed design makes it fun for everyone involved.
- Cut a slot on top of the box for easy card collection.
- Decorate the box to look like a friendly dinosaur.
- Add stickers and glitter to make it more attractive.
Displaying The Box
Displaying the Dinosaur Valentine Box can be a wonderful way to show off creativity. Place it on a table or a shelf where everyone can see it. Use colorful markers and paint to make the box stand out.
| Location | Benefit |
|---|---|
| Classroom Desk | Easy for classmates to drop cards. |
| Home Shelf | Great for family to admire. |
The box can also be a centerpiece at a Valentine’s Day party. Kids will love seeing their dinosaur creation in the spotlight. Don’t forget to add some fun elements like googly eyes or foam shapes to make it lively.
Frequently Asked Questions
How To Make A Dinosaur Valentine Box?
Start with an empty shoebox. Decorate it with dinosaur-themed materials like green paint, scales, and googly eyes. Add a slot for cards.
What Materials Are Needed For A Dinosaur Valentine Box?
You will need a shoebox, green paint, craft paper, googly eyes, glue, and scissors. Optional items include glitter and stickers.
Can Kids Help Make The Valentine Box?
Yes, kids can help paint, glue, and decorate the box. Supervision is recommended for cutting and using glue.
How Long Does It Take To Make?
It usually takes about 1-2 hours to complete. Drying time for paint and glue may vary.
Conclusion
Crafting a homemade dinosaur Valentine box is both fun and rewarding. This easy shoebox project sparks creativity in kids. Perfect for school or home, it adds a personal touch to Valentine’s Day celebrations. Dive into this adventure and make memorable moments with your little ones.
Get crafting and enjoy!
